Ideas for Food Photography
Creating beautiful food photos that stimulate the minds and appetites of your customers may seem difficult for a food truck operator just learning about food photography.
Keeping the subject simple will allow the audience to concentrate on the food, but at the same time the hey should also look luscious and enticing enough to make the audience want to line up at your truck.
Beginner’s Guide to Food Photography
We have many simple photography ideas for bloggers and beginners that you will find helpful here.
You can improve your photography skills with these easy tips and tricks compiled by our team. You can use this article whether you need to create your own personalized cookbook, a tutorial video about food, or editorial work that is needed for a magazine.
Shadows and highlights
When shadows add interest to composition by adding interesting shapes, they can enhance the image.
However, harsh shadows should be avoided in most still-life and food photography. Shadows add depth to the scene without overpowering the subject.
Avoid harsh shadows by shooting food photos in overcast weather or an area with light shading.
In the case of a bright, sunny indoor photoshoot, diffuse the light with a semitransparent white curtain.
The food may also be moved farther from the window or used another window on the opposite side of the house.
Try using a reflector if you haven’t the option of shooting in shade on a sunny day. It is enough to use a white piece of paper or a professional photography reflector.
Orient your reflector to face the sun – the side where there are shadows. Reflectors bounce sunlight back onto the subject, brightening shadows.
Above, you can see how I photographed the green smoothie using this technique. I used a white sheet of paper to reduce the harsh shadows on one side of the subject since it was a very sunny day.
In the end, the shadows in your photo are up to you. Light and shadow play a role in creating the image you envision, so stay aware of them and take control of them.
Try to use simple, neutral-coloured backgrounds
Backgrounds are essential when taking photos of food. Viewers’ attention will be distracted if the background is too messy or too colorful.
You can make the food stand out better in a scene with a neutral background. It’s not necessary for the background to be completely plain, but it should complement rather than hide the subject.
Food photography works best with three types of backdrops: light, dark, and wooden (brown).
When presenting food on a light background, dark foods look good, and when presenting light foods, dark foods look good.
A wood background, such as a table or chopping board, generally goes well with almost any type of food.
Backgrounds can be created using a variety of objects. If the wooden table is near a window, it will provide lots of natural light, which is great for backdrops.
Tablecloths and tea towels work well as well. Some foods tend to work best with white fabric, while others can work with bright colors. The vintage floral pattern shown below is an example of a subtle pattern that sometimes looks good.
You could also use a black chalkboard, a black carpet or rug, tiles, baking paper, or even a newspaper as a background.
In addition, a neutral wall can be used if you are shooting your food from one direction. Find a large object with subtle, neutral color.
Color Composition
You can experiment with color when you take pictures of food. In addition to affecting composition, colors also affect the overall mood of your photograph.
Use the same colors in the composition shown above. Warm earth tones benefit harmony in the composition, evoking feelings of comfort and serenity.
Color contrasts tend to work against your composition. It creates an exciting, lively and vibrant image that stirs emotions differently in the viewer.
In photography, red and green contrast well. Using contrasting food colors or the background can create an interesting contrast.
Shooting From the Correct Angles
Take food photos from various angles to maximize the subject. Think about which angle to use when taking photos of food. In some cases, the best strategy to photograph food is from above, especially when it’s arranged on a plate or bowl.
The benefits of shooting from above are numerous. You can highlight the bold shapes in the dishes, cutlery, and other objects in the scene by including all the details of the food and background within the composition.
Using a surface allows you to arrange the elements in an easier and stronger composition.
Additionally, it helps eliminate distracting backgrounds in an outdoor setting or in a room with a lot of activity.
For subjects such as drinks in glasses or cakes with interesting layers, consider shooting from one side.
If you want to illustrate a slice of bread, a cake, a muffin, etc., then shooting from one side is also a good option. Be sure to use a neutral background such as a wall when taking pictures.
Thirdly, you can try shooting diagonally. To capture the subject’s three-dimensional shape, this is the best option for including both the side and top views.
You should try shooting your food from a variety of perspectives if you are not sure of which angle will best capture it. Changing the shooting angle makes an incredible difference.
Composition and Arrangement of Food For Photography
Food arrangement will have a significant impact on the final image. In order to create a great food photograph, each element needs to be carefully placed in the scene.
Messy food photos on a plate are the worst. Real food photography doesn’t look like that. In order to create balance and visual interest, arrange your food in a neat or unique manner.
I love cutting fruit and vegetables into similar shapes and placing them on a plate to make patterns.
You may want to check the edges of the plate and the background after you finish arranging your food.
Take the picture after cleaning up spills. It should look as clean as possible.
Proper use of negative space
You should leave some space around your plate when photographing food, so that it doesn’t fill up the entire frame.
In close-ups of food, some negative spaces often create a more pleasing composition and emphasize your subjects’ shapes.
A light background can make the image appear brighter and more open than one with a dark background.
Put the subjects in different positions within the space and see what happens. Perhaps it would look better if the plate of food were placed in the middle of the frame or positioned on one side.
When possible, place the subject in several positions within the space while taking multiple shots.
You can then choose the photo that creates the most balanced composition after you have taken the photos.
Tasteful use of decorative features
It’s important to include food and a background in your photos, but to make them more interesting, you should also consider adding some other items to the scene.
If you used dry ingredients when cooking your meal, you can include them in the soup. A combination of these elements can enhance the look of a food photo by creating a “visual recipe.”.
Attractive, unprocessed ingredients make interesting visual features in photos.
The spices could be created in piles, or sprinkled over parts of the scene lightly.
Another way to decorate food is to use fresh herbs, fruit pieces, nuts, and chocolate.
Decorations other than food could also be found. A ceramic utensil can be used because it has lines and shapes that are strong enough to build your composition.
The photo below shows colored stones that might complement the food, such as the small household objects.
Color interaction is important when choosing decorations. You must take into account your food and background colors. What do you prefer: contrasting colors or similar colors?
Suggest a story in your photos by including people
Adding happy people to your food photos is another technique that you can use to make your menu more compelling.
In many of my food pictures, my hand or arm is visible. By using this technique, the viewer feels as if the photo had been captured from their perspective.
Using this technique, you will only be able to use one hand to hold your iPhone. Therefore, be sure to press the shutter button while holding the iPhone steady.
You can add a sense of movement to a static scene by including the hand (yours or others) using cutlery.
Including everyone’s hands in the scene is a great idea if you have company. Historically, food has been a means of bringing friends together to share delicious food.
The Role of Simplicity in Your Compositions
As we discussed, you can accessorize your composition with various kinds of decorations, but sometimes the best choice is to keep it simple.
Oftentimes, a simple minimalist composition is the best choice when the subject of the photograph is bold in color and shape, and the background is contrasted in color.
You should keep your subject perfectly central within the frame to create the strongest visual impact, and don’t use heavy decorations.
Plates, dishes, and cups with patterns or bright colors should generally be avoided. If you’re thinking of using white china, it is an excellent choice since it won’t compete with your food for attention.
It tends to be best not to use any additional decorations in a scene when shooting close-ups of food.
If elements of other forms were included in the composition, their impact on color and texture would be diminished. In photography, there are times when less is more.
Highlights and Lowlights
Before you press the shutter, you need to adjust your camera’s exposure level after composing your shot with the lighting and elements you want.
Brightness is referred to as exposure in photography. It is common for white plates and backgrounds to appear overexposed (too bright and blurry).
Expose for the highlights instead of the shadows if you want to prevent overexposure. It just means that you set the exposure levels so that the brightest areas of the scene show some detail.
Tap on the area you wish to be sharp in the iPhone’s camera app to adjust exposure. You can then scroll up or down on the screen to make changes.
You can increase exposure and brighten the image by sliding up, or decrease exposure and make it darker by sliding down.
If you photograph high-contrast scenes, such as a white plate against a black background, you’ll face huge exposure problems.
Because of the stark contrast, both highlights (bright areas) and shadows (dark areas) will struggle to maintain detail. It will either overexpose the highlights or underexpose the shadows.
Whenever possible, set the exposure for the highlights first, then brighten up the shadows afterward. Overexposed highlights are much harder to bring back to life.
Therefore, creating a scene that has not to have too much contrast between light and dark will result in a better exposure.
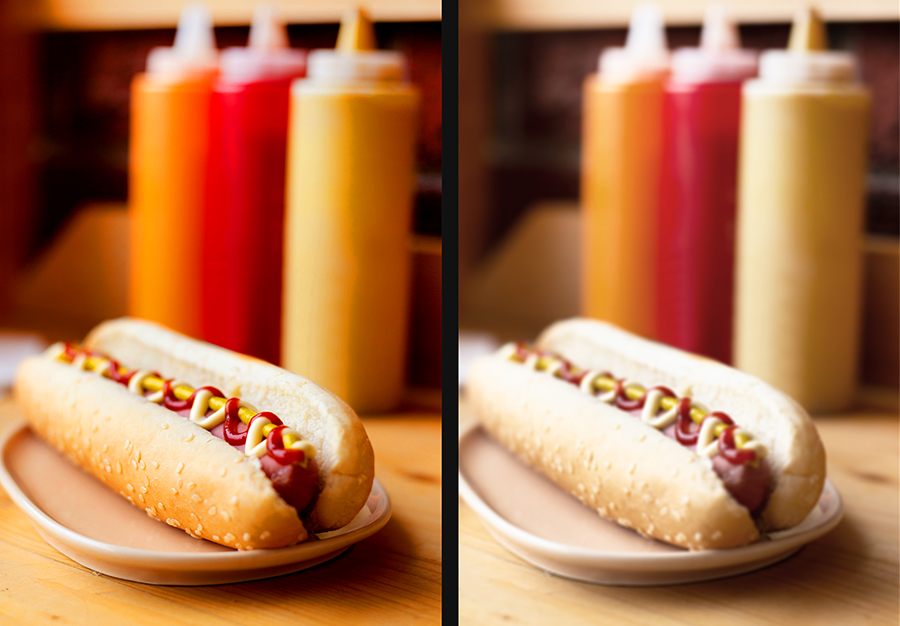
Enhancing and correcting your colours
The colors of food are amazing, but sometimes your iPhone doesn’t fully capture them.
Maybe you’d prefer a brighter color scheme, or maybe you’d prefer muted tones.
With a photo editing app, the colors can be easily adjusted after you’ve taken the picture. I like to edit my food photos with VSCO.
A great photo filter app for iPhone is VSCO. There are many “one-tap” filters that are very easy to use, as well as tools for adjusting color and exposure that let you make fine adjustments.
I usually go through the filters carefully until I find one that enhances the colors and mood of the image. Adding vibrant colors will increase the intensity of the image.
Fading and muted colors increase the mood of the image, making it softer and more subdued.
Instead of using filters, you can use individual adjustment tools to adjust settings such as saturation, temperature, tint, and fade.
If you make these adjustments, you can fine-tune the color of your food photography until you reach the look that you desire.
Learn more about how you can enhance your images with the VSCO app by checking out their tutorials on the VSCO website at https://vsco.co/
Leave a Reply